
 Finally! That was almost painful! Not quite like labor, but I feel like I just gave birth to something after all the anticipation! I don't even know why I make announcements that I'm gonna do something. I was just looking back to get the supply list and I realized that it's been a month since I announced that I was working on this. OK, enough of that already. It's finally uploaded so lets get started.
My goals today are to show you how I chose to color this image, and to give you a couple of basic tips on coloring. My in-person classes are much more involved, but this will give you some ideas and get you started.
Supplies:
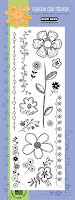
A stamped floral image ( look for an open floral with at least three layers)
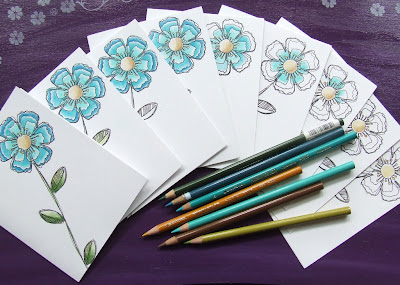
Color pencils: 3 blue-greens (or 3 shades from any one color family), 2 greens, and 2 yellows/browns
Glitter
And again to remind you of the specific supplies that I'm using:

 Prismacolor Pencils:
3 blue-greens (PC992 Light Aqua, PC902 Aquamarine, PC 1027 Peacock Blue), 2 greens (PC 1005 Limepeel, PC911, Olive Green ), and 2 yellows/browns (Yellow Ochre, PC941 Light Umber)
Stamp: Large flower and stem wit leaves from this Hero Arts set (Artistic Borders )
Ink: Versafine Onyx Black
Paper: Georgia Pacific White Card Stock.
Embellishment: Ranger's Diamond Stickles Glitter Glue
~~~~~~~~~~~~~~~~~~~~~~~~~~~
There are three things I want you to remember.
Embellishment: Ranger's Diamond Stickles Glitter Glue
~~~~~~~~~~~~~~~~~~~~~~~~~~~
There are three things I want you to remember.
Sharp Pencils: I always start with sharp pencils.

I've been using this pencil sharpener marketed by Prismacolor. I purchase a new one every few months because they get dull. I color a lot so every few months is necessary for me, but replace yours when you feel like it's not sharp anymore.
Light Touch: I almost always use a very light touch when coloring. I once heard a elementary school art teacher describe it to the children as tickling the paper like a butterfly. I feel like I have more control when add a little color at a time, repeating until I get the intensity of color that I'm looking for. Sometimes you will want to increase the pressure to blend or burnish, but for the most part, I use a light touch to apply the color.
Relax and enjoy: This is paper and coloring, not brain surgery. When I color, my goal is to enjoy what I'm doing while hopefully creating something beautiful. I'm not shooting for perfection or realism. My desire is to create interest with my coloring.
Let's keep those three things in mind as we go thru Steps One to Nine.

Step ONE: To get started with this image, I use Yellow Ochre on the center of the flower. I don't worry about coloring all the way to the lines. I'm deliberately leaving white area around the edges because it creates a feeling of depth. Color in all the little shoots/stamen from the flower with this color too.

Step ONE: To get started with this image, I use Yellow Ochre on the center of the flower. I don't worry about coloring all the way to the lines. I'm deliberately leaving white area around the edges because it creates a feeling of depth. Color in all the little shoots/stamen from the flower with this color too.

Step TWO: Add the brown for shading. I'm adding it to the bottom right as if my imaginary light source is to the top and left.

Step THREE: Most of the time I add color in straight lines. Sometimes I add it in a circular motion. This time, using Light Aqua, I actually did both. I colored most of the petal in straight lines...

Step Four: ... until I got close to the end of the petal. I chose a circular pattern so that I could carefully leave just enough of the paper showing thru to create a halo at the end of each petal.

Step FIVE: I took a picture here to show you that I colored the petal lightly first and then went over it again to darken the color. You should be able to tell that some of the petals are darker than the others.

Step SIX: is more repeating, but this time I used the Peacock Blue. The darker the color, the more dramatic the halo appears. Here's a tip for you-- When you are trying to color a flower the same color instead of three shades like I am doing here, make sure there is a variation in color where two layers overlap. You can do this halo, like I'm showing here for the top layer, or simply go over the layer beneath a couple more times to darken it.

Step SEVEN: Color the outermost layer with Light Aqua.

Step EIGHT: Color the leaves and the stem with Limepeel, the lighter of the two greens.

Step NINE: Color parts of the stem with the Olive. Don't completely cover the Limepeel. (Remember we are creating interest, not necessarily shooting for realism.) Add Olive to the parts of the leaves that is closest to the stem. Also color along the center line to shade.

And here it is with the coloring done. Before I actually send it, I'll add a little glitter to it, just in a few spots or maybe even a message. I may even box these up as a set and give them as a gift. -- sometime this century, but if you know my track record, I wouldn't bet on it happening in this decade.

Thanks for coming to class today. If anything isn't clear, email or comment and I'll try to make it make sense to you. Feel free to ask any questions you might have-- about coloring that is. :)
Now that this is done, I am going to concentrate on the video. I'll add it to this post when it's done. Let's hope for some sunshine tomorrow so that I can get good natural light for it.
Q & A
Q~ Judi wanted to know if she could use any color pencils because she doesn't have Prismacolor Pencils?
A~ Sure, you will get the same sort of results with any artist quality pencils. You can also try a less expensive brand such as Crayola or Rose Art, but you may not get the exact same look. You may remember that I did a comparison of color pencils and found that the differences in the pencils were noticeable but minor. For instance, you can do this with technique with Crayola Pencils, but you will have exert more pressure to get the color to transfer to the paper. Artist grade pencils typically have softer leads so you can color with a lighter touch and have the pigment lay down on the paper. Like I mentioned before I feel like I'm more in control with a lighter touch. You can also get a smoother blend with artist grade pencils. You'll see the pencils lines with the less expensive pencils. Try the technique with whatever you have. Personally, I've had Prismacolors for 30 years ( Each time I say that I feel older!) and I'm not sure I could live without them.
15 comments:
Your coloring is always so gorgeous, Jacki! I'll be "reporting for class" next week! :-)
Absolutely breathtaking. Thank you so much for the demo, you make it look so easy.
So, this was WELL worth the wait! Absolutely stunning results and I appreciate the step-by-step because you make it "look" so easy that I think maybe *I* should try it! Can't wait for a video, too!
Thank you so much for this tutorial. So detailed and simply explained. I have learned a lot from this...I only have 4 prismacolour pencils but lots of other good brands...so I'm off to practice more..but will never match you!
This is terrific. I love your coloring. Thanks so much for a great tutorial.
This is just beautiful Jacki! I love the beautiful shading!
Thank you for doing an online color pencil class!! Now I'm off to practice!!
These are so very pretty!
Jacki! Wonderful tutorial. Thank you! I really like the three things you said to keep in mind - especially three. :o) creativity should be relaxing...
Take care and STAY POSITIVE!
Great tutorial on how to use colored pencils and get some awesome results. That is almost as great as my recycled card don't you agree??? Your my "hero" from the Hero Arts gang. Pat
Hey... this is GREAT! I think you did an awesome job explaining how you get such a beautiful result. Very clear and doable... thanks for sharing!
Great tutorial! Great coloring too!
Simply beautiful! Oh my... such valuable info here! I love to color, too (I also use Prismas), and can't wait to implement your tips. Great step-by-step, too! Thanks so much, Jacki. :)
Thanks for the tutorial, I especially appreciate the trick about the halo!
Thank you for this tutorial. Love to color!
Post a Comment