
With the postal rate increase still a part of our at least weekly conversations, here is what I do to my cards to keep the weight down.

Finished Card size: 6.5"x 5"
Flower (Hero Arts),Words(Hambo Stamps)Ink: Basic Brown (SU)
Coloring Medium: Prismacolor Pencils and pencil eraser
Other: Circle Punch, Ticket Corner Punch, Ribbon, Mini Pop Dots
Flower (Hero Arts),Words(Hambo Stamps)Ink: Basic Brown (SU)
Coloring Medium: Prismacolor Pencils and pencil eraser
Other: Circle Punch, Ticket Corner Punch, Ribbon, Mini Pop Dots
Let me begin with one of my favorite tools. You will see my new purple Fiskars 12 inch portable paper trimmer in these photos. I don't remember if I blogged about it, but I bought this at Michaels after New Year for $3.49! They were marked $4.99 and for some reason when I got to the cash register they rung up for $3.49. ...and I only bought two! It came with 2 cutting blades and one scoring attachment. What a bargain!!!
Back to my tip...
Step One: Make card base.

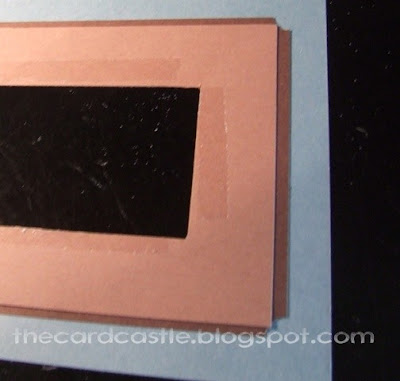
Step Two: Measure the first layer. I don't usually add a lot of layers, but sometimes the design dictates a number of layers. My first layer covers most of the card base. I leave 1 /16 of an inch on all sides by cutting it 1/8 inch smaller than the card front on two sides. This trimmer is divided into 1/8 increments.
Step Three: This is my favorite part. I cut out a great deal of the card stock that would be hidden anyway.

I line up the paper against the left edge of the trimmer. The cutting line will be one inch in. This is the only trimmer I have that it's possible to know exactly where the cutting stops and starts. Put the point on the side of the blade on a line that is one inch from the top edge. This piece is 5 inches wide so I start it on the 4 inch line. Bring the blade cartridge towards you and stop it at the 1 inch line. Turn the piece one quarter turn to the right and repeat that step until you've cut all four sides leaving you with a 1 inch frame.

Repeat steps Two and Three for each layer.


Step Two: Measure

Step Three: Cut

You end up with frames. You can use the centers on this card or they can go into your scrap box for next time.
I apply adhesive to the inside edge of each layer before mounting. This is the top or front side.

I apply adhesive to the inside edge of each layer before mounting. This is the top or front side.

In this photo you can see all the layers before I glue it down to the card base.

Before I colored this, I tried to decide what kind of card this was going to be. Any occasion?? ( wired ribbon from Dollar Bin at Michaels)

or sympathy?

Here's how I round the corners. I did this same technique for the strips on the puppy card the other day. Using a circle punch, I put one end of the strip into it from the back and use the punch to cut the rounded edge.

As you guessed from the beginning of this post, I chose to make this a sympathy card. This image was colored with Prismacolor pencils and blended with an eraser-- a regular-pink-top-of-the pencil eraser. You can take off a lot of the color and blend in what's left. The background was done the same way. I used one of those rarely used French Gray pencils on it's side to create the movement in the background and shading and the pink pencil to blend the colors together.
On a personal note: What a loooong weekend! We joined that church we had been visiting (off and on since July) so yesterday was the discovering membership class. This is a class where they walk you thru the requirements for membership and tell you about all the ministries in the church. It was three hours long including a meal and time to mingle with other new members.
I also signed up for the Ladies Bible Study. ( Lord I want to Know You- Kay Arthur)
I've been wanting a formal study. I'm not as disciplined on my own.The car situation has been rectified. We are a 2 Honda family now.
My youngest son is at home sick today. Too sick for school ( low grade fever) but not too sick for video games. Before I knew he was going to be home, I had planned to head to Michaels today to make my February samples, but I think I'll take a nap instead....
Have a blessed day!
7 comments:
This card is lovely and that is my favorite trimmer, have it and love it but paid more than $3.49 FOR IT.
Jacki, Lucky you on finding your trimmers. I went to Michael's after you mentioned it on GW but they didn't have any so I'm still using my old charcoal one I have had for years. Love the card, will have to try your layering idea. sandie994
What a beautiful card. You are SO talented. I'm very impressed!
I have YET to find a trimmer that I can call my favorite. But maybe once I get back to actually scrapbooking, it'll hit me. But $3.49...you can't beat that. Great find. And it's purple? Even BETTER!! :-)
Thanks for showing how to do this. I'll have to try it the next time I make a card like this. I have the same trimmers and love it!
Love your sympathy card, it is very elegant. Loved your tip on how to get those rounded edges on the mats. Thanks for sharing. Pat
This is Adorable...Love it!!!!
This is such a gorgeous card.
Thanks for stopping by my site..
Your work is beautiful..
Post a Comment